When you click on links to various merchants on this site and make a purchase, this can result in this site earning a commission. Affiliate programs and affiliations include, but are not limited to, the eBay Partner Network.

Old paint/chrome repair

#eBayPartner    Most Recent BUY IT NOW Items Listed on eBay
eBay Auction Picture

sirlombo

On Training Wheels
Hey!

I'm starting to restore an old finnish "tunturi" from the 50s.
There is quite a bit of rust in the frame and mudguards. The idea would be to take rust off as much as possible, keep the original paint and apply some protective layer.

The plan for painted areas would be like this:
1 - Soap wash
2 - WD 40 (or some other oil product) applied with copper wool
(would polish compound be a good alternative in this case?)
3 - Car wax as a protective layer

On chromed areas, I would use the same procedure but maybe on step 2 could use chrome polish compound instead?

Would this be a good procedure or would you recommend some other one?

Thanks in advance,
-M
 

Attachments

  • IMG_1050.jpg
    IMG_1050.jpg
    121.9 KB · Views: 608
  • IMG_1054.jpg
    IMG_1054.jpg
    93.3 KB · Views: 566
  • IMG_1053.jpg
    IMG_1053.jpg
    101 KB · Views: 564
  • IMG_1051.jpg
    IMG_1051.jpg
    78 KB · Views: 564
  • IMG_1055.jpg
    IMG_1055.jpg
    113.1 KB · Views: 587
Anything that will clean a car will clean a bike.

Have at it.
 
Mix up some Oxalic Acid (wood bleach) and soak the chrome parts for 24 hrs. Be careful with the stuff. All the rust will come right off and it will not harm the chrome. It may hurt paInt, so don't use it on those parts.

Rinse well, apply light wax or polish.

Good luck!
 
I've done some experiments with Oxalic over the years. I've seen many posts on fora going back and forth over whether painted parts can go in the Oxalic solution. I've seen Evap-O-Rust in the stores, but have always passed on it because of the cost and because Oxalic seems to be a workable solution to rust.

Oxalic acid is not a cure-all. It does an outstanding job lifting rust. However, if you have rust underneath the plating, it will pull up the plating in sheets. It will do the same with paint, if rust is enough mixed into the paint. What happens is the acid dissolves the rust, but in so doing it frees whatever is bound in with the rust from adherence to the steel. So if you have a rust spot and the rust has spread underneath the surrounding plating, it will not only dissolve the rust in the pit itself, but it will leech under the plating, dissolve that rust, and thereby leave a big sheet of plating that will come clean off the steel. It will do the same with paint- it cleans the pit, but then if there is rust under the paint, it will dissolve that and pull up the paint bound in with the rust. However, if the paint has good adherence to the steel and it is clean underneath, then it will stay put. Left long enough, the acid can straight dissolve the actual paint as well, but that's a longer soak than should be going on.

When I do painted parts in Oxalic I check every few minutes (10-15) and rub with a clean cloth. If I see too many signs of paint coming up, I pull and wash down the part. If it looks like I'm getting rust and no paint, I return to the soak for another few minutes. I'm a bit more aggressive with plating, but not much. I check every 30 min or so on that. I might leave a part in a couple hours, at most. If the solution is more diluted, you may end up going longer.

The result is that you have to know your part in terms of age and condition. If you suspect it's a truly antique part with possible rust infiltration sideways from the pits, you may want to limit or skip the soak. If you do soak, test the part every few minutes with a cloth if it is painted- check how much color comes off on the cloth. With plating, look for signs it is bubbling underneath to make sure you don't "soak off" what's left of your plating.

Oxalic should not be used for silver-derivative plating/metal and should not be used with Cad plating. Cad plating is the most relevant issue to bikes, and if you soak your cad parts in there, it will pull the plating right off. You can actually see it coming off in the solution if you watch.

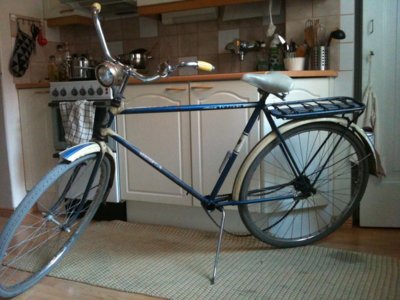
The front fender on the Columbia below was covered in surface rust. I did the soak and check, then rinsed, cleaned, and polished the part. The cloth showed a little blue, but nothing more than would be produced in a conservative polish job. The result is pretty clean.

attachment.php
 
Last edited:
SirMike1983, Thanks for writing this VERY informative article on this stuff. I was curious how it works and i'm still a little scared to try it but you eased some of my worries. I usually clean paint with 000 steel wool and rubbing compound and it kills the rust as it polishes without scratching to bad. Do you have any before pictures of your front fender? I'd like to see the before/after result. Thanks again!
 
I'm with Slick. Thanks for the instructions. Very well written. It will be copied and pasted in my instructions file
 
For chrome & plated parts I just use a soak of straight distilled white vinegar with great results checking the parts hourly until the rust is gone. Do not leave them overnight though, you need to check hourly. Distilled white vinegar is cheap & safe. Then use grade #00 steel wool to gently remove the rust & residue. Works on cadmium, chrome or nickel. I follow up with Meguiars Marine-RV metal polish.

On paint I use WD40 with #00 steel wool very lightly on rusty areas followed by rubbing compound (gently using it), polishing compound next, & finally a couple of coats of carnauba wax. I also use the carnauba wax on my plated parts after cleaning. Meguiars is my product of choice.

I have never tried oxalic acid although Mike's results look fantastic & are well explained. I just shy away from anything with acid in the title preferring something a little safer.

Good luck!!!!!
 
Well Oxalic Acid IS acid...but you have to mix up a weak batch. Most guys recommend about a Tablespoon per gallon. I forgot most of my chemistry, but this yields about a 1% (or so) solution and is very safe.

Now I still don't touch it and I wear all the protective gear, but it is safe and this allows a full 24 hr soak on most parts with good rust removal and minimal to zero bad effects on the good parts. Though SirMike is right...you don't want to use it on Cad plated parts and some other funky metals...but for most steel...I love it!

IMG_3369-1.jpg

IMG_3379-1.jpg
 
nice before and after

One question to you guy that have used Oxalic acid, do you need to run baking soda or something like that to neutralize the acid after dipping?

I have bough some of that Oxalic acid or wood bleach but have yet to make a full dipping bucket of it.
 
SirMike1983, Thanks for writing this VERY informative article on this stuff. I was curious how it works and i'm still a little scared to try it but you eased some of my worries. I usually clean paint with 000 steel wool and rubbing compound and it kills the rust as it polishes without scratching to bad. Do you have any before pictures of your front fender? I'd like to see the before/after result. Thanks again!

Here are two fenders that I bought together. They came off the same bike and were in basically the same condition on arrival. The one on the left was in the bath and the one on the right was not.

attachment.php


Here is the bath: an old garbage can filled with Oxalic acid. The fender is dipped and flipped. Some parts get double dipped as a result, but I monitored it closely and it worked out pretty well. If you look very carefully you can see that below the water line, the white paint stripe is already clean, whereas above it's still rusty. The brace was a throwaway as I had better ones already and installed them when I was done. Make sure you check your time for dipping duration.

attachment.php


Here is the inside of the fender after treatment:

attachment.php


Another after shot:

attachment.php


I do keep a light reading bike blog:

http://bikeshedva.blogspot.com/

It will not have the heavy, technical details of the stuff I do, but it is more a light reading thing with lots of pictures. The idea is basically just to have fun with old bikes that are riders.
 
Back
Top