


WillWork4Parts
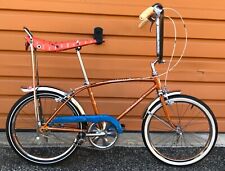
Cruisin' on my Bluebird
This is the Monark seatpost I was talking about...was beat and chewed on before I bought it. I had tried Kroil soaking already and managed to get it to run a steady flow from seat tube cutout to crank hanger. Previous to that picture I had drilled the top tapered over part out, put a 1/2" rod in and put a pipe wrench on it, that way it wouldn't crush. The pipe wrench bit alright! Turned and there was no slippage, only a loud "tink" before I busted my knuckle. The tapered tip sheared straight off! Monark posts are 7/8" dia but thinner wall tubing and more brittle than a Schwinn mind you. This was the point where I decided to call in the saws.
Started with a hack saw from the inside, 2 cuts, one across from eachother. Decided that was taking too long...so I ordered some 12" HSS blades for the sawzall. I was very paranoid about cutting into the wall of the seat tube, so I'd cut a little and try to stay as parallel to the seat tube as I could, pausing every little bit to run a spoke down the groove and make sure I hadn't made it through the post. Anything thinner than your saw blade and longer than your seatpost will work, you just run it down the groove to make sure you can feel it drop off over the end of the post and then touch the seat tube. If you don't feel that step, you've started cutting the seat tube. I completed one cut to where it was as deep as I was comfortable with and tried pliers on the little bit of the tube I had left sticking up. You could see the cut closing up and it would twist a bit, but it was only 3 or so inches down the tube that the split was flexing. It still wouldn't twist out without damaging what little I had left to work with. So I cut the second groove deeper. This time the split tube just wanted to fold over itself when I tried to twist with pliers. I made a tool from a solid 5/8" bar with a slot cut in the end and a flat piece of steel driven in the rod slot...to simulate a shaft and keyway that could then be driven into the 2 grooves I had cut in the seatpost. This tool was to eliminate any flexing or crushing of the seatpost. I ground 2 flats on the other end of the rod so I'd have something to turn it with, like a wrench. Keep in mind I had to make the tool match the grooves I cut in the post, since they weren't exactly opposite from eachother. The flat piece of steel I drove into the rod had to be just wide enough to fit the diameter of the seat tube and just as thin as the sawzall blade(which happened to be 1/16" thick). As I drove the rod/keyway setup into the post, you could hear the paper thin part that was left split. I twisted the post out with pipe wrench on the seatpost and pliers on the flat of the rod after that...almost as easy as a normal seatpost. What a relief! Turns out this post wasn't even rusty, but the last photo might show the bulge and bend that was holding it in place so tight. This is what you have to go through and why you don't just run that old bent seatpost on home!!! Sorry, end rant. But that's one sure-fire way to remove a seatpost if you're looking to save finish and not use heat.
Last edited:
