When you click on links to various merchants on this site and make a purchase, this can result in this site earning a commission. Affiliate programs and affiliations include, but are not limited to, the eBay Partner Network.

How to remove a vintage master link

#eBayPartner    Most Recent BUY IT NOW Items Listed on eBay
eBay Auction Picture

Jennifer Parker

Wore out three sets of tires already!
This is is how to remove a vintage master link that is the older spring steel type. They have no clips holding the plate on. They are held on by the pins being slightly wider than the cover plate's holes. The plate fits into the grooves in the pins and locks it into position. I also discuss how to find your master link if you have a super crusty chain as I did.

[video=youtube_share;-9voIF29ZrA]http://youtu.be/-9voIF29ZrA[/video]

i also hope I did this right to upload it.
 
I Like It!

more people need to put in the effort to make a vid!
not me of course...
 
A little birdie told me the unsinkable Jennifer Parker even had to do this twice due to an unfortunate technological incident resulting in the loss of the entire content of the first production.

I hate it when that happens :p

Way to hang with it ...

pap
.
 
And three set adjustments for lighting!

I actually haven't posted the entire content of the earlier failure. That would have been a whole lot longer. I figure it's better to break it up into tiny bites for the ADHD folks like me. I had the phone propped up in a koosie on top of a small metal coffee can to get the right height clearance. And the loud click and sudden brightness was a super bright led lamp with two flat panels of lights that are stupidly amounts of adjustable.

If you haven't seen the pictures of my before and after chain cleaning efforts I have them for two of the chains. My murray, and mom's western flyer. My chain pictures will be first. Then mom's. Trust me, hers was a miracle moment.

My my chain was so crusty I couldn't find the master link, and I spent almost a week trying. The first picture is the chain "repair" tool that's supposed to mash one of the pins out so you can take it off the frame. I was careful, and slow, and backed it off several times to check my alignment. I barely got the pin on the chai to shift when the driver pin on the tool snapped off. The second shot is me going old school and propping the chain on a wood block, taking an old ice pick and rubber mallet, and tapping the pin out.

Tapping... Yeah... Okay; so a real short, hard swing as the light touch wasn't working. Please not the nasty color the chain has in the first two pictures. The chain was a black sedis sport chain, and I don't know why. It's period, though. That's why the finish is a little uneven in the third picture. I pushed the pin I whacked out with a small c-clamp. I put the pin into the threaded arm's footwell and slowly shoved it back I. There. I spent five minutes ensuring the thing was going in straight. I flipped the chain when I was as close as could get so I could make it even with the rest.

Ill have to finish this tomorrow. I'm so tired.
 

Attachments

  • image.jpg
    image.jpg
    84.3 KB · Views: 483
  • image.jpg
    image.jpg
    84.3 KB · Views: 487
  • image.jpg
    image.jpg
    89.6 KB · Views: 497
Chain off one of my western flyers...

This is the chain on one of the western flyers. It's more a chain shaped object in the first picture. I took another picture after the first degreaser and detergent round of scrubbing. This one has some rust visible. Most of what's still on it was hardened lube and crud. The last shot is after three cleaning rounds with lots of scrubbing with a brass bristle brush. I lubricated it so it would be nice and pretty. The master link is visible in the second and third picture. The plate style like this is easier to find on heavily crusty chains so you can concentrate on soaking that part when soaking it to get it off he bike easier. It open the same as the one in the video I made.

I also soaked it in an oxalic acid bath after all the degreasing to get the rust. Way at do you think of my finished product?
 

Attachments

  • image.jpg
    image.jpg
    75.9 KB · Views: 452
  • image.jpg
    image.jpg
    104.4 KB · Views: 444
  • image.jpg
    image.jpg
    115.6 KB · Views: 437
This is the chain on one of the western flyers. It's more a chain shaped object in the first picture. I took another picture after the first degreaser and detergent round of scrubbing. This one has some rust visible. Most of what's still on it was hardened lube and crud. The last shot is after three cleaning rounds with lots of scrubbing with a brass bristle brush. I lubricated it so it would be nice and pretty. The master link is visible in the second and third picture. The plate style like this is easier to find on heavily crusty chains so you can concentrate on soaking that part when soaking it to get it off he bike easier. It open the same as the one in the video I made.

I also soaked it in an oxalic acid bath after all the degreasing to get the rust. Way at do you think of my finished product?

You can spend about ten minutes a get these results. No scrubbing with wire brushes and multiple chemicals. Just a bucket, Goof Off, and towel.

DSC02508.jpg
 
I've tried goof off, and it didn't work very well for me. It may be good for chains that are less crusty then mine were.
 
Last edited:
Here's my chains which were bought here or off project bikes.....First step was to soak in dollar store degreasers.....I was surprised at how much the chains loosened up after just the degreaser for an afternoon in the warm sun. Here the4 chains are drying after degreasing in the coffee can full of the degreaser I show here. I didn't get a before shot for some reason but trust me, they were typical rust and grease encrusted stiff chains.
DSCN2366_zps5c59165e-1.jpg


After degreasing, soaking in new Evaporust...The chain on top was black and cruddy before, like yours,but once the grease was cleaned off the chain was almost new looking. You can see a few rusted spots where the grease did not protect it, and this was what I was attempting to clean off. The rollers are also stuck somewhat but freed up after derusting, unlike some of my worse chains..
DSCN2367_zps70187904-1.jpg


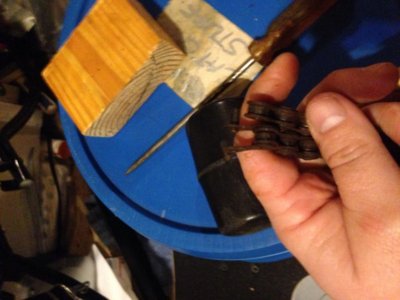
What Jennifer did was try to clean the chain on the bike, so she could find the masterlink...That is a hard way to clean a chain, once it is off the bike it is a ton easier. But, catch 22, you can't find that master without cleaning it. I have access to air tools, and might have been tempted to use a soft air powered wire brush to preclean, till I found the link. A brass brush by hand might be an option too.

The question I have, on skiptooth chains, are the rollers supposed to be able to turn in all cases, and will they loosen up once on a bike if you get them to the point you could move them with a needle nose pliers but not with your fingers?? I can get the side plates to shine like new with Evaporust but the rollers remain black.
 
The evaporust is awesome, but my budget is too tight for it. I said cleaning the chain on the bike if you can't find the master link. The other two where I could find them were just soaked where the master link was so I could get it open. I don't have a person to wield a screw driver while I'm trying to pop off a still stuck, crusty master link. I do all the major cleaning once they're off the bike.
 
Back
Top