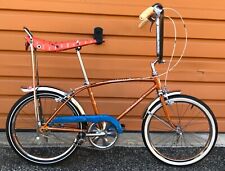
When you click on links to various merchants on this site and make a purchase, this can result in this site earning a commission. Affiliate programs and affiliations include, but are not limited to, the eBay Partner Network.

Model 1588 Iver Johnson Arch Truss Roadster -- To refinish or not to refinish

#eBayPartner    Most Recent BUY IT NOW Items Listed on eBay
eBay Auction Picture
Trued up the front wheel last night and mounted the tire. I now have one Chinese part on the bike...the rim strip! I should have bought some Velox but forgot so I pulled a strip from a wheel in the parts bin. Right now they stick out like a beautiful thumb, but with some use they'll look better. I didn't distress them because I'll either refinish the bike someday or let the rims wear in. I also didn't think to black out the stupid sidewall graphics on the tires until after I took the photos with a Sharpie. Barely noticeable if you're not looking for them.

8945407210_a358ffe4d2_c.jpg
8944789341_35e7671d6a_c.jpg


I also rebuilt the Morrow hub I'm using. The Titanic is in better condition than the shell on the original and the braking surface was cracked so I opted for function over absolute correctness.

8944767227_e190c6a6de_c.jpg


Hopefully I'll be lacing the rear up tonight and getting the bike back on the ground.With that it'll be rideable again.

8944771509_ea245a2d69_c.jpg


I also got my Delta light working. I admit I didn't quite keep this stock either. It has a CREE LED from a 1200 lumen flashlight in it. I managed to mount it without changing the housing in anyway. Just took an aluminum cylinder out of the flashlight, glued the LED to it and drilled it for a set screw to mount over the original bulb holder. It has High, medium, low, blink and SOS modes. Kind of fun.
8944780291_593118dcce_c.jpg

8944775953_24811efdb1_c.jpg
 
RE: Nice ride

Looks like you did a great job on the wheel build - Sharpies are fantastic little items at times! Interesting idea on the light - will make it a very useful rideable bike at night.
 
Yes, the wheels went together well! I had to retrue them last night but I figured they'll move around a little until everything is seated. I had some bearings to tighten races on as well. Bike rides very smoothly. I took it out at lunch time yesterday and went for a short 7 mile ride to visit a friend who has a mess of antique cars. 26/10 gear ratio is just about right. I was thinking it would be too hard for the rolling hills around here.
 
On the 20th of this month I'll be riding 500 miles stopping at the Wheelmen National meet (for the swap at the least)

Should be a good time.

Decided that since my bicycle budget has become ever smaller that I should build a rack instead of buying one even though someone had a sweet rack in the classifieds for only $60.

I like how it's turning out. Just need to drill some holes, put in some rivets and bolts here and there and fabricate a drop stand and seat stay mount.

I made the rack support follow the angle of the upper fender stay as there was way too many lines going on back there. I thought about incorporating the fender stay with the rack, but I want to be able to remove it and keep the fenders on. Next I have to learn to make saddle bags.

9021152161_cc6d9abf87_c.jpg


9021151005_35385e0d0d_c.jpg


9023377992_2b9a8a3f2e_z.jpg
 
One day till blast off (Thursday). First leg of the trip is nearly 60 miles from Gosport, IN to Columbus, IN via Martinstucky, Morgantown and Edinburgh.

Finished the rack two days ago and carted my camera equipment home and it held up perfectly. I may have overbuilt it. Don't think I'll have the drop stand ready by the time I leave but it's not critical to the journey.

Saddlebags are still not finished but should be this evening. Burned up a whole spool of thread figuring out my 1940s sewing machine that didn't come with a manual but I think I've got it adjusted properly and it should be ready to stitch the heavy oiled canvas I'll be using. I wanted to use leather, but I didn't have enough on hand. This canvas stinks like hell.

971758_10151688803920406_1499810694_n.jpg

I started using the machine above, but quickly bound it into a knot. Too many complicated settings so I went back to my antique straight stitch no-nonsense workhorse. Canvas is all cut and laying all over the floor.

Pre-rack shot just for fun.

1002720_10151692255050406_2023092980_n.jpg


Anyone see a battery box like this before?
7907_10151692259965406_689321820_n.jpg
 
Cool project.

I like your bike. I just rode my Iver through the streets of Denver last night. It gets nice & cool here in the summer evenings. I found one of those digital signs that post your speed and remind you to slow down (like the one below). I got it to 32 mph (it was down hill). I kept circling back and trying again. My goal was 35, I will try again tonight. These bikes love fast. I do too.

Radar_speed_sign-1.jpg


My Iver....

Iver2-1.jpg
 
LAWBREAKER!

Well done. I've gotten mine up to 25.6 mph according to my runtastic roadbike app on my phone. Kinda cool in that it maps your top speed, average speed, your route, time and distance traveled, temperature and allows you to enter weather and road type as well as how you felt at the end of the ride.

Kind of fun if you just want to see some stats. I'm not a competitive rider so that's all it is for me.

Saddle bags are shaping up.

1010655_10151692913570406_1901128964_n.jpg


Did two bags out of oilcloth tonight and have to figure out the straps and fasteners. Good thing it's only 1 a.m. and I don't have to be at work today until 8 a.m.
 
Can you tell me how the shop you went to counterbored the holes to fit the spoke washers in the way that they did it?

Just remembered this video I made a while ago. Here you can see Antonio Carminati boring the holes one last time (real quick). I'm not a wood guy, so don't know the precise name of the bit he's using in what must be a 60-year-old or more Italian drill press!

http://www.youtube.com/watch?v=YOIjohMcTqU
 
Back
Top