When you click on links to various merchants on this site and make a purchase, this can result in this site earning a commission. Affiliate programs and affiliations include, but are not limited to, the eBay Partner Network.

Painting 61 Balloon Wasp

#eBayPartner    Most Recent BUY IT NOW Items Listed on eBay
eBay Auction Picture

Chris

Finally riding a big boys bike
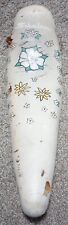
I started painting my 1961 Wasp today. Past couple of days was sanding, then cleaning with wax and grease remover. Then I primed with a 2K primer (can) from Sherwin Williams auto paint.

I took in my original fender and matched the black and white paint off of it, the color codes are shown on the can. Since I’m not using a spray gun, I had Sherwin Williams auto put the paint in cans with the hardener able to be activated just before use.

I’m planning on using stencils to get the graphics right for the front frame area, chain guard, and fenders. That’s tomorrow if the paint is dry enough. Once the stencils are over the white areas, I spray the rest of the bike black...then remove the stencils when the black paint is tacky (according to stencil instructions).

You’ll see from the pictures that just the areas on the frame that need to be white are painted white. For the fenders, since there is a white line that runs the length of the fender about one-inch up from the bottom, most of the fender needed to be white. The same for the chain guard. My chain guard has paint runs on it, but not where the stencils are going, so after the stencils are applied, I plan to sand the paint runs with 600 grit sandpaper, tack cloth, then paint the remaining areas black.

4757A05D-50DD-45CE-A34F-E0378D0D6F80.jpeg


B9EFBC6E-5828-4C0C-8FD9-0C65E1ED5EE5.jpeg


668076AF-CD0A-42BC-9FC2-60DC230A9719.jpeg


9ED59C8D-B5E0-4AE2-A36C-AC83B09E0505.jpeg


2AFA1E00-4D18-42B5-A858-2DC779834DD2.jpeg


170023F2-904B-4F8D-A0C7-298A5478F200.jpeg


B99EDD0D-78C9-4BE9-8FBD-1FB4C437B84E.jpeg


8C0B9F57-0629-4271-84CD-12FDFD4D5C42.jpeg


E1E9C9F8-C59B-4958-910E-2A40624D7393.png
 
Looking forward to seeing the progress and finish on this one - Good luck!
 
:cool: I was wondering a few days ago if you got started on the Wasp. Is there a recoat window with that paint or can you shoot your second color at any time afterwards? I've shot Automotive Acrylic Enamel with a catalyst using a gun but kept the paint flowing until it was completely done.
 
I applied the stencils over the white paint today for the front and rear fenders and the frame. Some surprises that made the job much harder.

First, the fender stencils don’t run all the way to the end. You start the stencil about 13 inches back for the front fender and about 15 inches back for the rear fender, working the stencil flat as you go toward the end. You end up masking a lot of the fender tip to cover where the stencil stopped. For applying the pin stripe that runs the length of the fenders, you use 1-inch masking tape and place pieces about every three inches along the fender edge. This provides the 1-inch offset needed to run the stencil in an arch.

The other surprise was the stencil that has the feather shape that is in four places on the frame. This stencil was not a one-piece stencil but three small pieces. This made alignment of the pieces difficult and the consistency of the gaps between the pieces a nightmare. I hope you have better luck getting one-piece stencils for this particular graphic.

The black is painted on all parts, will be removing the stencils when the paint is tacky. I could not use the stencil for the chain guard since the one provided was not a reverse stencil like the others but instead a direct stencil with gaps to paint the white letters on the black chain guard, opposite of all the others stencils...another surprise. Will have to decide if I risk white overspray by painting the chain guard stencil or instead use a water decal. Will see how things look in the morning, more updates tomorrow.

BBC3EC23-9379-4152-A0CB-FFBA79E0E051.jpeg


C412E4D5-A7B3-44E9-87E7-9930333FFDC7.jpeg


27D688F2-5AAE-447A-990C-8E122840F9E6.jpeg


32DB3020-E199-4BB7-96C1-085C1830DFDB.jpeg
 
For the black paint over the white, you use a nylon scuff pad (600 abrasion) to scuff the shine off the paint, then tack cloth, then paint over the white. If you were recoating for any reason, it would be the same process, use scuff pad to dull the existing layer then recoat.

I’m not planning to clear the paint as it’s a single-stage paint and clearing is not needed.
 
Finished the painting and removed the stencils about 1.5 hours after painting, enough time for the paint to harden some but not too long that the stencils covered in paint stuck to the frame. The fenders and frame turned out fine, mostly crisp lines around the stencils, some edges that are not as clean, but looks good overall.

The chain guard stencil didn’t work. It was not a reverse stencil like the others. I applied it and then sprayed the paint in a cup and painted on the white paint, but it came up with the stencil. I could not scuff the area for the stencil text without dulling the black paint in other areas, hence the adhension problem I think. This is why the reverse stencil is better, the paint you need is the base coat, not the top/final coat.

I’m getting a Wasp decal from Memory Lane, the correct one is very hard to get and not available on eBay. I just have the decal for the Schwinn seal on the chain guard for now. Not sure what I’m going to do for the white stripes that are supposed to be on the guard too, there are no decals for this detail that I’m aware of. I kept the original bike shop decal by covering it up prior to painting. The paint around it is original and matches the new paint perfectly.

I leave to go overseas for work in under a week, taking the bike with me. Worried the paint may not be cured enough for the wrap packers put on bikes/house items. Thinking to keep the paint from sticking to things I may use parchment paper in most areas against the paint. It’s not supposed to stick to parchment paper. It’s pretty dry now since the paint had hardener in it, but it takes a couple of weeks or so to fully cure.

488F5DD8-0DEF-4C34-BC47-3F46AB9CB408.jpeg


EF8752E5-D370-47AE-9D57-4CC881493511.jpeg


630007F3-5C08-4122-9406-66BA8F487FEE.jpeg


91125DB4-488C-4991-9928-060A0483131B.jpeg
 
Looks like loads of fun! I did lace painting decades ago and that was definitely loads of fun. That painting fad died out after a few years though. How about wrapping the frame and parts in wax paper with a little packing tape to hold it in place?
 
I was thinking the same, but parchment would likely work as well. We used the wax paper between freshly painted and oven baked enamels at the mfg of door hardware I worked for when shipping “under the gun”, and not having much extra curing time.
 
For the fender braces, which set goes on the rear and front, there are two different lengths, one longer and one shorter. A set approximately 11 3/4 inches long and other set 13 inches long. I have the shorter set on the rear fender now and it does not come up to meet the top attachment point or the front lower attachment point, so think it’s wrong. These are fender braces attached with the screw-on rivets, so didn’t want to redo them without checking first.

Are they mixed, a long and short on both fenders? My Schwinn manual does not cover fender installation.
 
Last edited:
Back
Top