When you click on links to various merchants on this site and make a purchase, this can result in this site earning a commission. Affiliate programs and affiliations include, but are not limited to, the eBay Partner Network.

The Betty

#eBayPartner    Most Recent BUY IT NOW Items Listed on eBay
eBay Auction Picture

Woodtickgreg

Look Ma, No Hands!
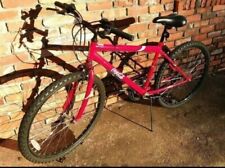
Well after I fi ished my custom red typhoon cruiser my girl said I had to build her one. So this build is called the Betty, it's another custom cruiser.
So this is what I started with, a 1953 Schwinn Spitfire.
20190105_155324.jpg


20190105_154002.jpg

I love this style of chaingaurd.
20190105_160247.jpg

It spent its whole life in the Detroit area.
20190105_160254.jpg

Original tires, I sold them at the Ann Arbor swapmeet.
20190105_163141.jpg

Painted S-2's
20190105_163213.jpg

Original kickstand.
20190105_163636.jpg

New departure rear hub, I replaced that, you'll see with what later.
20190105_163649.jpg

Nice AS clamp and bolt.
20190105_163706.jpg

So this is what I started with.

20190105_163649.jpg
 
Looks like that has been kept original all these years. Usually the girls don't like them there seats. That serial number was also used in 1952 but I think you got the correct year pegged looking at a few of the components.
Have fun!
 
So i put the spitfire up on the work stand and stripped it down.
20190105_164737.jpg

Didnt take long to get to this point.
20190106_182600.jpg


20190113_125559.jpg

All the stuff that's going to powdercoat.
20190220_190059.jpg
 
So while the frame and other parts where at the powdercoater I started working on other parts for the build. I took a lot of the parts to my work and glass bead blasted them to clean them up. I also like to keep some of the metal parts raw and I just clear coat them. It leaves them with kind of a grey metal finish that I like and still protects them from rusting.
Original kickstand before.
20190109_160802.jpg

After a trip to the glass bead cabinet.
20190109_171658.jpg

It's an original Miller brand.
20190109_171713.jpg

I used rust-oleum clear enamel to seal it.
20190109_172612.jpg
 
Next up was the crank, nice dog leg style. I use fine scotch brite pads and 0000 steel wool to clean a lot of parts. I barely touched the chrome on the crank and it came right off! But it revealed the copper plating beneath it and I thought it looked cool so I went with it. I think it will fit nicely with the direction I'm taking this build.
20190111_172402.jpg

Original Wald crank.
20190111_172408.jpg

The copper looks cool in my opinion.
20190111_172427.jpg

A little clear coat so it doesn't tarnish.
20190111_175226.jpg


20190112_135802.jpg

And it still has a little patina.
20190111_175236.jpg

This was a mistake that turned into something cool. You'll see as the build progresses how it will fit in.

20190111_175236.jpg


20190111_175236.jpg


20190111_175236.jpg


20190112_135802.jpg


20190111_175236.jpg
 
Next was preparing the S-2 rims for powdercoat.
20190116_180423.jpg

The wheels will get new spokes so I just cut the old ones out because most of them where so rusty they wouldn't turn.
20190116_182442.jpg

Hubs will not be used so I bagged them for use on other projects.
20190116_185222.jpg

Some rim dings and dents will be tig welded up and ground smooth before they go to powdercoat.
20190116_185252.jpg
 
Back
Top