


rebirthbikes
I live for the CABE
I found this on a Craigslist ad about 40 miles south of where it was manufactured in Middletown, Ohio. I met a scrapper at a casino at 8:45 pm and shortly there after I loaded it into my car and brought her home. The provenance as I was told goes like this... This is a one owner bicycle and the owner died about fifteen years ago and his estate was in litigation. The estate finally settled and the new owners decided to level the house and start fresh and that is where the scrapper found it. According to the estate owners this bicycle was the deceased owners pride and joy. His parents owned a dairy, and possibly other businesses, in the Northwood/Cincinnati area. Apparently, sometime in his forties or fifties he painted the bike black and gave it to his grandson to use when he visited. After the Merkel owner passed away his bike sat inside the house untouched for the last fifteen years behind some palettes in the basement. He showed the newly found bicycle to the new owners and they gave him the bicycle as a gift. He didn’t know what to do with it, but he saw the wooden rims and decided to sell it. He told me it was listed for four months on Craigslist and I was the first one to contact him. I'm still attempting to track down the original owners name or his family businesses. Hopefully something more will come of that.
Shortly after I began, I decided that because of what the bicycle was, because it was rare, and because of who manufactured it, I was going to document the process. This is my first attempt at this and so this is where I'll start:
I did a quick test with some 0000 steel wool in the parking lot and I saw a whole lot of orange and part of "M" on the downtube. Of course the part I picked to test the black paint was directly above the transfer of the name. I stopped instantly and loaded the bike up for the trip home. Once I got it home, I decided to disassemble it and get all the black off of the bicycle.
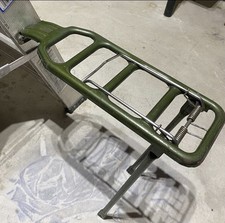
The first photos are from the Craigslist ad and then the day after I got her home.


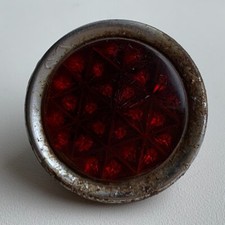
The next day after I got her home and began disassembling her for cleaning and maintenance I decided that because it's a Miami Cycle bicycle and they manufactured most of their own parts and components and because there are so many differences in so many of their offerings, I decided to document all the little oddities or manufacturing techniques I came across. (my wife grabbed some photos of me working on it too... so I put them in, because I realize that I don't know what a lot of you actually look like... so this is me)")


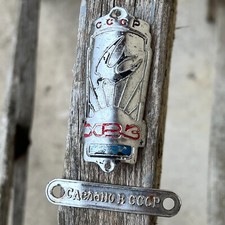
These last few photos are to show how thick the paint is in spots. After I dug into the project and I had it disassembled I soon realized that parts of the bike were painted black first and then white and the bike was painted at one time and full assembled. There are a lot of thick drips of dried paint underneath of all the horizontal bars and the fork and rear of the bicycle are going to be problem areas. Both areas have quite a bit of nicks and scrapes in the original paint that were painted black. You can sort of see cracks in the paint, or dimpling in the paint and it is all covered by thick black paint. In the second to last photo above are the remnants of the head tube transfer. You can see some of the dimpling and the thickness of the paint I was referring to. The head tube had taken some hits in its early life.
It's going to be slow and steady to win this race and there's quite a few transfers I want to preserve. The down tube transfer was uncovered on the night I got her and more later the first day at home. I am pretty sure I accidentally rubbed some of that downtube transfer off in the parking lot the night I got her. At this point, I realized that I need some advice. The 0000 steel wool and wd40 was only going to get me so far and I wanted to preserve as much of the transfers as I possibly could. I reached out to someone who I knew had stripped a bicycle of thick house paint and saved transfers and foil paint. Shawn(freqman1), made a phenomenal recommendation/technique. I tested his recommendation/technique on another bike that I have which is also covered in black paint. It worked really well, but you have to work quickly... too much time and you lose the original paint.
If you're following along. Work fast, be patient, work small, and focus on the minutiae.
This is going to be a project.


Shortly after I began, I decided that because of what the bicycle was, because it was rare, and because of who manufactured it, I was going to document the process. This is my first attempt at this and so this is where I'll start:
I did a quick test with some 0000 steel wool in the parking lot and I saw a whole lot of orange and part of "M" on the downtube. Of course the part I picked to test the black paint was directly above the transfer of the name. I stopped instantly and loaded the bike up for the trip home. Once I got it home, I decided to disassemble it and get all the black off of the bicycle.
The first photos are from the Craigslist ad and then the day after I got her home.
The next day after I got her home and began disassembling her for cleaning and maintenance I decided that because it's a Miami Cycle bicycle and they manufactured most of their own parts and components and because there are so many differences in so many of their offerings, I decided to document all the little oddities or manufacturing techniques I came across. (my wife grabbed some photos of me working on it too... so I put them in, because I realize that I don't know what a lot of you actually look like... so this is me)
These last few photos are to show how thick the paint is in spots. After I dug into the project and I had it disassembled I soon realized that parts of the bike were painted black first and then white and the bike was painted at one time and full assembled. There are a lot of thick drips of dried paint underneath of all the horizontal bars and the fork and rear of the bicycle are going to be problem areas. Both areas have quite a bit of nicks and scrapes in the original paint that were painted black. You can sort of see cracks in the paint, or dimpling in the paint and it is all covered by thick black paint. In the second to last photo above are the remnants of the head tube transfer. You can see some of the dimpling and the thickness of the paint I was referring to. The head tube had taken some hits in its early life.
It's going to be slow and steady to win this race and there's quite a few transfers I want to preserve. The down tube transfer was uncovered on the night I got her and more later the first day at home. I am pretty sure I accidentally rubbed some of that downtube transfer off in the parking lot the night I got her. At this point, I realized that I need some advice. The 0000 steel wool and wd40 was only going to get me so far and I wanted to preserve as much of the transfers as I possibly could. I reached out to someone who I knew had stripped a bicycle of thick house paint and saved transfers and foil paint. Shawn(freqman1), made a phenomenal recommendation/technique. I tested his recommendation/technique on another bike that I have which is also covered in black paint. It worked really well, but you have to work quickly... too much time and you lose the original paint.
If you're following along. Work fast, be patient, work small, and focus on the minutiae.
This is going to be a project.
Last edited:


