When you click on links to various merchants on this site and make a purchase, this can result in this site earning a commission. Affiliate programs and affiliations include, but are not limited to, the eBay Partner Network.

'74 Schwinn Camelback Strandie

#eBayPartner    Most Recent BUY IT NOW Items Listed on eBay
eBay Auction Picture
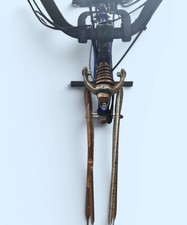
I took a moment to look at the frame out in the sun yesterday. It was looking good, but I knew it could look better.
BftD_74_strandie_21126_1.jpg


The Schwinn stamp on the seat tube had certainly seen better days, that's for sure.
BftD_74_strandie_21126_2.jpg

BftD_74_strandie_21126_3.jpg


The bolt holding this cable clamp to the frame was rusted stuck, and there was no way to remove it with vice grips.
BftD_74_strandie_21126_4.jpg


So, I busted out the Dremel tool and a small cutoff wheel, and removed it that way. It took a little longer than I thought it would, because the cheap mount for the cutoff wheel was not straight, so the wheel wobbled as it spun. None of the other attachments were any better. Still, it got the job done.
BftD_74_strandie_21126_5.jpg

BftD_74_strandie_21126_6.jpg

BftD_74_strandie_21126_7.jpg


For those who were wondering how I shine up old paint, here's how: I use Turtle Wax rubbing compound (the reddish-brown kind, not the white kind,) SC Johnson paste wax, and a bunch of old worn-out socks.
BftD_74_strandie_21126_8.jpg

BftD_74_strandie_21126_9.jpg


I put a bit of the rubbing compound on the sock, wrap it around whatever part of the frame I want to clean up, and then I just rub the sock back-and-forth against the frame almost like I was sanding it. This will cut into the paint a little, especially if you're rubbing the same spot hard and frequently, but I've yet to rub the paint all the way down to primer or metal. Then I go back over the spot I just rubbed with a clean sock, to buff it out and remove any excess compound. The process is the same for the paste wax, except you just wipe it on fairly gently, not rub it on firmly like the rubbing compound.
BftD_74_strandie_21126_10.jpg

BftD_74_strandie_21126_11.jpg


And just like that, the paint regains its former luster, without making it and the patina look wet!
BftD_74_strandie_21126_12.jpg

BftD_74_strandie_21126_13.jpg

BftD_74_strandie_21126_14.jpg

BftD_74_strandie_21126_15.jpg

BftD_74_strandie_21126_16.jpg


I wasn't sure what to do about the Schwinn graphic on the seat tube. Part of me wanted to just rub around it and keep what was left of it intact, while another part of me just wanted to shine up the whole bike and risk removing the graphic. Given that the rest of the graphics were already worn off before I even started working on this bike, and there was still a Schwinn headbadge up front, I decided to go for shiny.
BftD_74_strandie_21126_17.jpg

BftD_74_strandie_21126_18.jpg


I'm almost done shining up the frame, and it's looking great!
BftD_74_strandie_21126_19.jpg

BftD_74_strandie_21126_20.jpg
 
BftD_74_strandie_21126_21.jpg

BftD_74_strandie_21126_22.jpg

BftD_74_strandie_21126_23.jpg

BftD_74_strandie_21126_24.jpg

BftD_74_strandie_21126_25.jpg

BftD_74_strandie_21126_26.jpg


I had to see how that red wheel looked against the frame now that the paint's all nice and glossy. It looks even better now!
BftD_74_strandie_21126_27.jpg


I'd like to try and remove what's left of this reflective sticker if I can. What's the best way to get rid of these? I've used a hair dryer and a plastic burnisher in the past, but I wonder if using something like Goof-Off or something would be better.
BftD_74_strandie_21126_28.jpg
 
I took some time yesterday evening to work on the Schwinn again. I cleaned up the chrome on the handlebars, handlebar stem, fork, seat post, and chainring. I was surprised by just how much rust I was able to clean up on the handlebars! All I used was some #0000 steel wool and a brass wire brush for the more stubborn bits.
BftD_74_strandie_chrome_1.jpg

BftD_74_strandie_chrome_2.jpg

BftD_74_strandie_chrome_3.jpg

BftD_74_strandie_chrome_4.jpg


The fork turned out quite nice as well!
BftD_74_strandie_chrome_5.jpg

BftD_74_strandie_chrome_6.jpg

BftD_74_strandie_chrome_7.jpg

BftD_74_strandie_chrome_8.jpg

BftD_74_strandie_chrome_9.jpg

BftD_74_strandie_chrome_10.jpg


When I cleaned all the gaps between the teeth on the chainring, I noticed that while I was removing debris, I also seemed to be removing the chrome as well...
BftD_74_strandie_chrome_11.jpg

BftD_74_strandie_chrome_12.jpg


This became all the more apparent when I tried going over the front with some steel wool, only to immediately start scuffing it as a result. I tested another spot on the back, and almost instantly went down to bare metal. I know this chainring's from a later bike, but for some odd reason, the chrome felt soft and came off too easily, like it was painted on. I've never experienced this before. I may just have to wash it off as best as I can with soapy water, and leave it as-is.
BftD_74_strandie_chrome_13.jpg

BftD_74_strandie_chrome_14.jpg

BftD_74_strandie_chrome_15.jpg


After polishing most of the chrome parts, I ran up to my storage space to grab some coaster brake wheels for spare parts, plus the little OCC chopper bike for the front fork again. After I got those parts, I ran by my dad's shop to try and fix the 22T sprocket I wanted to use. I noticed it was bent when I tried using it on a previous build. Unfortunately, I just could not figure out how to fix this sprocket with a wrench and my dad's vice. In fact, it's possible I made it worse. Fortunately, I can get a brand-new 22T sprocket from Amazon for less than $10, which isn't so bad. If the local bike shops have one for sale at a similar price though, I may just buy locally instead.
BftD_74_strandie_chrome_16.jpg


I also had another trip to make today. See, while I still plan to swap the hubs and spokes between the red rims and mint green rims at some point, that will require some help from one of my local bike friends who know more about assembling and truing wheels than I do. Their schedules are not as flexible as mine, so there's no telling when we can work on that.

So, in the interest of moving this project along without having to wait for my friends' help, I went out to Joplin, Missouri today, and brought home this sunbaked Huffy for $15. The wheels alone are worth what I paid for it. They spin nice and straight, and they're red with chrome spokes like I want! Granted, the hubs are black, but I can work with that for now. They also have a little bit of wear and tear to them, which will fit right in with the rest of the bike.
BftD_74_strandie_wheel_donor_1.jpg

BftD_74_strandie_wheel_donor_2.jpg

BftD_74_strandie_wheel_donor_3.jpg


My phone camera didn't really capture it, but these wheels are more of a metallic/anodized red, unlike the gloss red wheels I mocked up earlier. These could look really good on this Schwinn! I'll find out when I mock up everything tomorrow!
BftD_74_strandie_wheel_donor_4.jpg
 
That vintage Huffy is nice, they don't have that bent-pedal forward downtube, and they were still putting water bottle attachments on ( now they give you a plastic cup holder). I picked up a metallic blue one, put out to the curb on trash day that was mint, turned it into a BMX clone. I looked at a Good Vibrations at a sporting goods store yesterday it was $199
 
While I didn't make the kind of progress I had hoped to make while the weather was still this warm, I did manage to get a few more things done these last couple of days.

First, on Wednesday, I washed the handlebar pad wrap and grips in the sink.
BftD_74_strandie_21826_1.jpg


The wrap didn't get that much more vibrant; it's just still wet from the wash, but it did look better. The grips cleaned up well enough, too.
BftD_74_strandie_21826_2.jpg


I threw both back on the handlebars, and I'm very happy with how it turned out. I may need to replace the foam pad, but that's about it.
BftD_74_strandie_21826_3.jpg


Next, I tried mocking up the mini OCC Stingray chopper fork again, as well as the wheels and tires I just got the day prior. While the fork could work with just a little more thread on the steerer tube, it doesn't really fit the look I'm going for with this bike. And I doubt it'd look much better if I just mocked it up with the wheels I was using earlier.
BftD_74_strandie_21826_4.jpg

BftD_74_strandie_21826_5.jpg

BftD_74_strandie_21826_6.jpg


I threw the other fork back on, and yeah, this is still the fork this frame needs. However, it was during this mockup, of ALL TIMES, that I finally noticed why those new wheels looked off to me. See how much more of a gap there is between the tires and the frame?
BftD_74_strandie_21826_7.jpg

BftD_74_strandie_21826_8.jpg


Yeah, that's because these are 24" wheels, not 26" like I need.
BftD_74_strandie_21826_9.jpg


I somehow failed to make sure the wheels were the correct size for what I needed right up until this moment. I had plenty of opportunities to avoid this mishap, and I still managed to mess up all the same. I wasted a full day, gas, and $15 on a set of wheels that I can't use on this bike.
d4bae0724c644b7c607fb845eae986d0.gif


While it sucks that I managed to fumble the ball like that, it's not a total loss. I do have a few 24" bikes that need wheels, and these were still worth the $15 I paid for them. I'm sure I'll find a use for them.

The next day, yesterday, I went out to storage to drop off the 24" Huffy Cranbrook and the mini Stingray, and to grab anything I could use for this bike or any of the others I'm working on currently. One thing I grabbed was this 24" Schwinn frame, thinking I could use the kickstand on this Camelback. Unfortunately, while the angle of the kickstand was good, it was still too short. So that turned out to be a dead-end.
BftD_74_strandie_21926_1.jpg


Something else I grabbed were these Schwinn badges, and the screws that held them in place. I needed the screws for another bike, but I figured I'd grab some spares just in case I needed them for this bike. I might swap the badge out for either the one on the left or right, but I have another idea for a headbadge I'm floating around.
BftD_74_strandie_21926_2.jpg


I also used Dad's belt sander to modify one of my busted flathead screwdrivers so I'd finally have a tool just for removing those tine Schwinn headbadge screws.
BftD_74_strandie_21926_3.jpg


I can confirm that it works!
BftD_74_strandie_21926_4.jpg

BftD_74_strandie_21926_5.jpg


Here's what was hiding behind that headbadge: some perfectly-intact factory blue paint! It really shows how much surface rust this bike had accumulated over the years.
BftD_74_strandie_21926_6.jpg

BftD_74_strandie_21926_7.jpg


Here's the camelback's original badge on the right, with all the other badges on the left. Something I'm thinking about doing is shining up the original badge as best as I can, then going back over the letters with red paint, to go along with the red and white accents this bike has going on. In fact, I'm considering taking it with me to the Darryl Starbird car show later today to see if one of the pinstripers there could paint that for me.
BftD_74_strandie_21926_8.jpg


I've got a few things I'm going to try to do on the bike today, so hopefully I'll have more progress to report soon.
 
Nice! Ya gotta love that "opaque blue." Another example of the color is on the 1973 Suburban below. I also put together a camelback with some vibes similar to yours but, obviously, you went much further. Mine is a 1968 Speedster in "sky blue." Funny, but "opaque blue" looks more like the sky than "sky blue." Have fun!

schwinn sub 2.jpg


speedster 4.jpg
 
Nice! Ya gotta love that "opaque blue." Another example of the color is on the 1973 Suburban below. I also put together a camelback with some vibes similar to yours but, obviously, you went much further. Mine is a 1968 Speedster in "sky blue." Funny, but "opaque blue" looks more like the sky than "sky blue." Have fun!

View attachment 2370782

View attachment 2370783

So the color is called "opaque blue," not "sky blue?" well that's confusing. Nice couple of Schwinns you've got there!
 
Made some more progress on this Schwinn this weekend! This update's so big it's going to have to be split up into at least 4 parts!

First, on Friday, I decided to see if one of my other BMX handlebars had a decent foam pad I could use to replace the deteriorating black foam pad I was using before. I just had this one here, but it would up being too small for my taste.
BftD_74_strandie_22026_1.jpg

BftD_74_strandie_22026_2.jpg


See those black specks on the wrap? That's the black foam falling apart.
BftD_74_strandie_22026_3.jpg

BftD_74_strandie_22026_4.jpg

BftD_74_strandie_22026_5.jpg


Next, I got to work figuring out how to make the fork work. The crown race on the chrome fork doesn't fit Schwinn bearings, and none of the Schwinn crown races I have fit the chrome fork. The inner diameter on this crown race is wider than even the later '80s-'90s Schwinn forks.
BftD_74_strandie_22026_6.jpg

BftD_74_strandie_22026_7.jpg

BftD_74_strandie_22026_8.jpg

BftD_74_strandie_22026_9.jpg


Here's what I was talking about with the bearings: the balls don't touch the race much, if at all, because the cage is sitting on the top lip of the race.
BftD_74_strandie_22026_10.jpg

BftD_74_strandie_22026_11.jpg

BftD_74_strandie_22026_12.jpg


Unlike on a Schwinn race, where everything fits as it should.
BftD_74_strandie_22026_13.jpg

BftD_74_strandie_22026_14.jpg

BftD_74_strandie_22026_15.jpg


So, if I couldn't change the crown race, I figured the next best option was just to change the bottom headset bearing to something else. Fortunately, I found a perfect solution pretty quickly! This Hartford 52 bearing fits both the Schwinn bearing cup and the fork race perfectly, so now I know I can use this fork on this frame.
BftD_74_strandie_22026_16.jpg

BftD_74_strandie_22026_17.jpg

BftD_74_strandie_22026_18.jpg

BftD_74_strandie_22026_19.jpg

BftD_74_strandie_22026_20.jpg
 
Next, I looked into using the headset hardware from the blue step-thru donor Schwinn. While it could all totally work, I may have a better option coming up! (I'll get to that when it happens.)
BftD_74_strandie_22026_21.jpg

BftD_74_strandie_22026_22.jpg

BftD_74_strandie_22026_23.jpg

BftD_74_strandie_22026_24.jpg


I now had all the headset hardware in place, which would help with figuring out how much of the steerer tube to cut off later.
BftD_74_strandie_22026_25.jpg


Next, I busted out the rubbing compound, and cleaned the rest of the black paint off of the headbadge.
BftD_74_strandie_22026_26.jpg


I also went ahead and cleaned off the head tube. Now this whole frame's sitting pretty!
BftD_74_strandie_22026_27.jpg

BftD_74_strandie_22026_28.jpg

BftD_74_strandie_22026_29.jpg


I also cleaned of the seat, which mostly meant using a little steel wool for the chrome crash bar, and a wet cloth to wipe off any dust and debris from the seat body.
BftD_74_strandie_22026_30.jpg

BftD_74_strandie_22026_31.jpg

BftD_74_strandie_22026_32.jpg

BftD_74_strandie_22026_33.jpg

BftD_74_strandie_22026_34.jpg

BftD_74_strandie_22026_35.jpg


I put it all back together, and this bike just looks so good that I can hardly wait to ride it!
BftD_74_strandie_22026_36.jpg


I installed the badge with the best black paint, and while it looks good, I think a badge with red SCHWINN letters will look even better.
BftD_74_strandie_22026_37.jpg

BftD_74_strandie_22026_38.jpg

BftD_74_strandie_22026_39.jpg


My phone camera can't really capture the blue paint accurately, but I wanted to try and capture the shine this paint has now.
BftD_74_strandie_22026_40.jpg
 
At the Darryl Starbird show, I knew there'd be a few pinstripers out at the event, but I wasn't sure I'd want to carry the whole bike seat with me to try and match the red color. So I dug through my Hot Wheels collection to see if I had something close enough to work with, which I did.

I still stuffed the whole seat in my camera bag and took it with me anyway.
BftD_74_strandie_22026_41.jpg


I made it out to Darryl Starbird with my parents around 6pm on Friday, and one of the first things I had to see was my friend Ruby's collection of lowrider bikes he built and painted. Plus I wanted to show him the progress I've made on that Schwinn camelback frame I got from him last month! He loved what I've done to it, especially since I was building it about the same way he wanted to when he had it!

This is the part of the thread where I just want to show off my friend's bikes, and what I can only dream of being able to do with paint some day.
BftD_74_strandie_22026_42.jpg

BftD_74_strandie_22026_43.jpg

BftD_74_strandie_22026_44.jpg

BftD_74_strandie_22026_45.jpg


This black-and-pink Schwinn was the real star of this lineup. Ruby had jammed on the paint for this bike for the past month leading up to the show, getting it to where it is now just the day before he loaded it up and brought it and the rest of his bikes to the show. The crazy thing is that there's still even more that he wants to do to it, like adding pinstripes, spiders, bats and other gothic elements to it! This dude is insane when it comes to his bikes! I can only hope to one day be even half as good at painting with rattle can paint as he is!
BftD_74_strandie_22026_46.jpg

BftD_74_strandie_22026_47.jpg

BftD_74_strandie_22026_48.jpg

BftD_74_strandie_22026_49.jpg

BftD_74_strandie_22026_50.jpg

BftD_74_strandie_22026_51.jpg

BftD_74_strandie_22026_52.jpg

BftD_74_strandie_22026_53.jpg

BftD_74_strandie_22026_54.jpg


Ruby doesn't just build these bikes for show though. He actually rides them too. In fact, he rode this 24" Monark all the way from Tulsa, Oklahoma to New Orleans, Louisiana last year, if I remember correctly. I actually remember when this bike was still a rusty bare-metal work-in-progress a few years ago.
BftD_74_strandie_22026_55.jpg


While Ruby has loads of experience with paint, he hasn't done as much pinstriping. Still, he pinstriped the letters on this Delta headlight, and it looks alright for the bike it's on. (He had someone else do the rest.) This is when I decided that I wanted Ruby to be the one to pinstripe the red letters on the Schwinn headbadge. I mean heck, he's the one who gave me the frame and fork, so I figured, who better to add a touch of pinstriping to this bike than the dude I got the bike from in the first place?
BftD_74_strandie_22026_56.jpg

BftD_74_strandie_22026_57.jpg

He also got that chainring from me as part of the trade that got me this bike last month. Looks good on that Monark!
BftD_74_strandie_22026_58.jpg

BftD_74_strandie_22026_59.jpg

BftD_74_strandie_22026_60.jpg
 
Back
Top